AR Composer: creating persistent AR scenes

AR Composer makes it easy to create persistent AR scenes. Here is how to use the app.
1. Install the application
- Make sure your iPhone/iPad is compatible with ARKit; the model number should appear in this list:
- iPhone 6s and 6s Plus
- iPhone 7 and 7 Plus
- iPhone 8 and 8 Plus
- iPhone X
- iPhone SE
- iPad Pro (9.7, 10.5 or 12.9) – both first-gen and 2nd-gen
- iPad (2017)
- Make sure that your device is running at least iOS 12.
- Install the app from the App Store.
- Launch AR Composer and tap "Allow" for all permissions requested.
2. Download 3D assets
Because no 3D assets are included with the app, the first thing you need to do is download the 3D object you wish to display in your AR scene.
- In the Library tab, press the "+" button at the bottom right corner of the screen.
- Open the "Demo assets" collection.To also see the 3D objects linked to your GuidiGO AR account ("My 3D objects" collection), tap the Menu icon at the top right corner then sign in.
- In the list, tap the blue icon next to the object you wish to download.
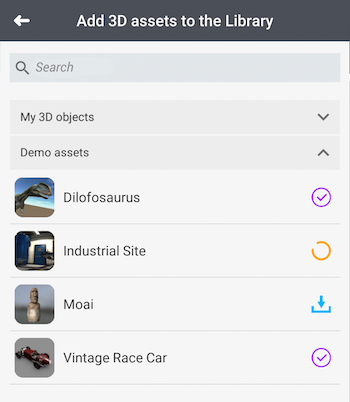
- Tap the back arrow at the top of the list to go back to the Library.
3. Create a persistent AR scene
To create an AR scene, you must be signed-in with a GuidiGO AR account.
- In the Scenes tab, press the "+" button at the bottom right corner of the screen.
- You will see a popup requesting access to the camera on your device. Tap Allow
- In the popup, tap Create a new scene.
- Enter a name for the scene; we recommend using the name of the room where the 3D asset will be positioned.The name of the scene should not contain any special character.
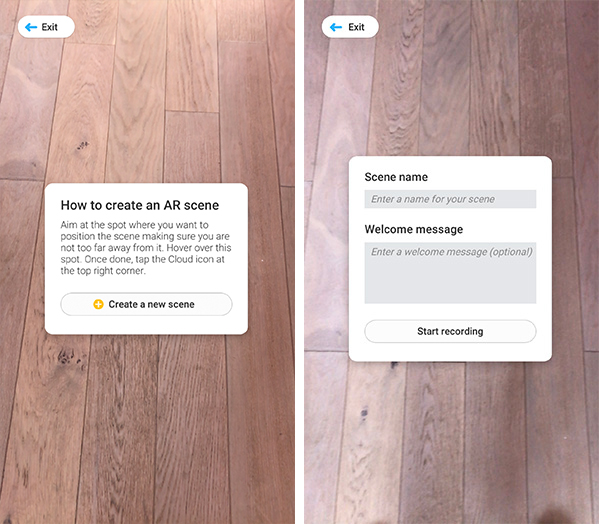
- The Welcome message will be displayed when users launch your AR scene. This field is optional.
- Make sure you are standing 6.5 to 10 feet (2 to 3 meters) in front of the spot where you want to position your scene. Try to avoid to create a scene in front of trees or plants.
- Tap Start recording.
- Use your camera to scan a panoramic view of the area in which you want your scene to appear (ie. 180° - from left to right and right to left). Make sure to include a flat surface, like the ground or a tabletop. Scan slowly so you can see blue rectangles appear.
- Once the whole zone is scanned, tap the Cloud icon at the top right corner (this icon shows only after a few seconds).
- Wait 10 to 30 seconds until the Congratulations popup appears.
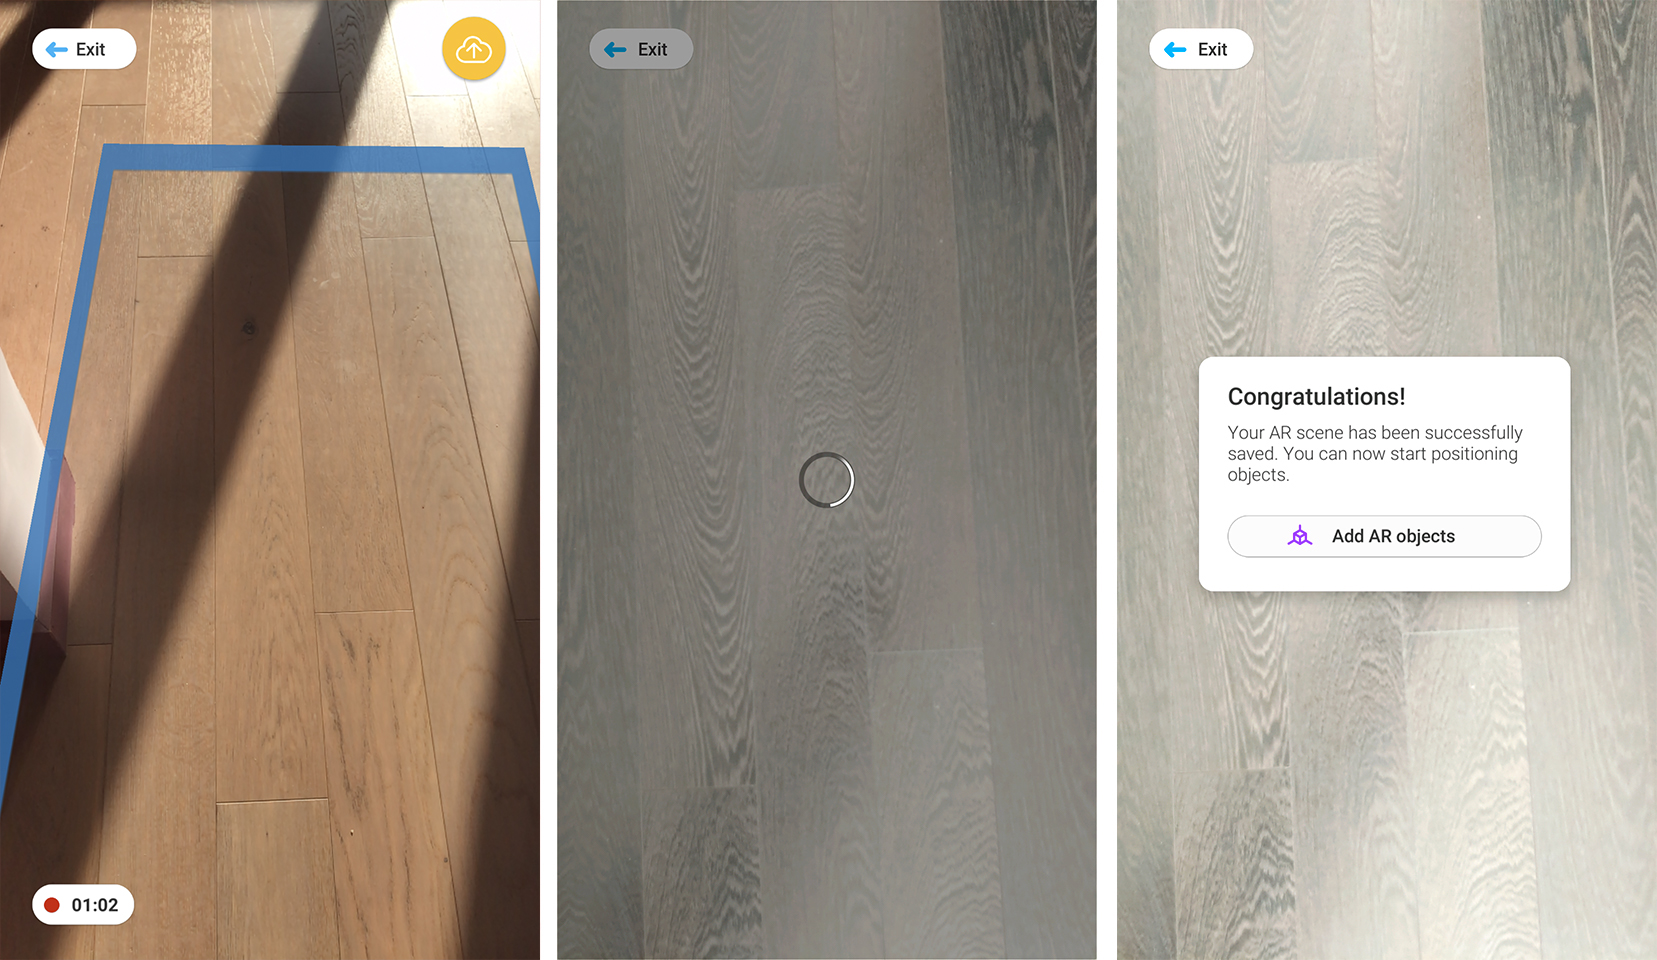
- Tap Add a 3D asset in the popup.
4. Position 3D assets in your AR scene
- Select an asset in the list. Note that, as long as you are in Edit mode, objects will appear semi-transparent.Big assets may not show the very first time you add them to a scene - especially if you've downloaded several 3D objects at the same time at step #2. In case the loader spins on your screen beyond one minute, exit the app. After relaunching it, wait 3 minutes then tap the Edit button of your scene and proceed.
- Tap Close to dismiss the "Credits" popup (if there is one).
- Aim your device at the flat surface where you want to position the asset, staying within the borders of your AR scene.
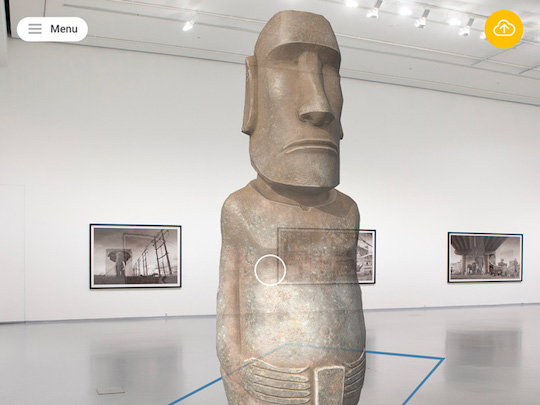
- Tap the Cloud button at the top right corner of the screen to save the position.To fine tune the position and rotation of the asset, use the toggle button on the left, then tap the +/- buttons to move/rotate the object along the 3 axes. The color of the +/- buttons corresponds to the color of the axes they adjust. Once you are satisfied with the asset’s position and rotation, tap the Cloud button to save.
- Tap Menu, then tap Exit scene.
5. View your AR scene
- In the Scenes tab, tap the Launch button for your scene. Make sure to stand within the borders of the scene in order to see the 3D asset.
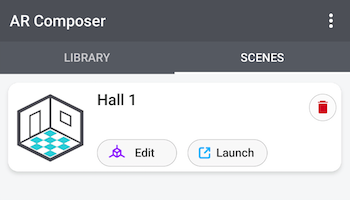
- Once your scene appears, you can walk around freely observing the 3D asset from every angle. Just avoid moving too far away from it.If the 3D asset disappears from the screen, aim at your scene to get it back; you may also need to take a few steps back.
6. Lock your AR scenes in visitor mode
Locking your AR scenes prevents users from removing them from the application.
- Tap the Menu icon at the top right corner, then tap Lock.
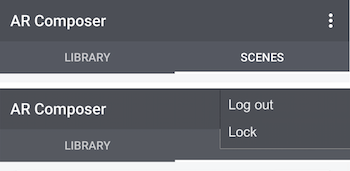
- Confirm by selecting Lock in the popup

- Once the application is locked, users are only able to launch pre-existing scenes.
 To unlock the application, tap Unlock in the Menu, then enter the following code: ARK2018. Note that this is a temporary code for demo purposes only.